
在本教程中,我们将开发一个Spring Boot应用程序,该应用程序使用JWT身份验证来保护公开的REST API。在此示例中,我们将使用硬编码的用户和密码进行用户身份验证。
在下一个教程中,我们将实现Spring Boot + JWT + MySQL JPA,用于存储和获取用户凭证。任何用户只有拥有有效的JSON Web Token(JWT)才能使用此API。在之前的教程中,我们学习了《什么是JWT?》 以及何时并如何使用它。
为了更好地理解,我们将分阶段开发此项目:
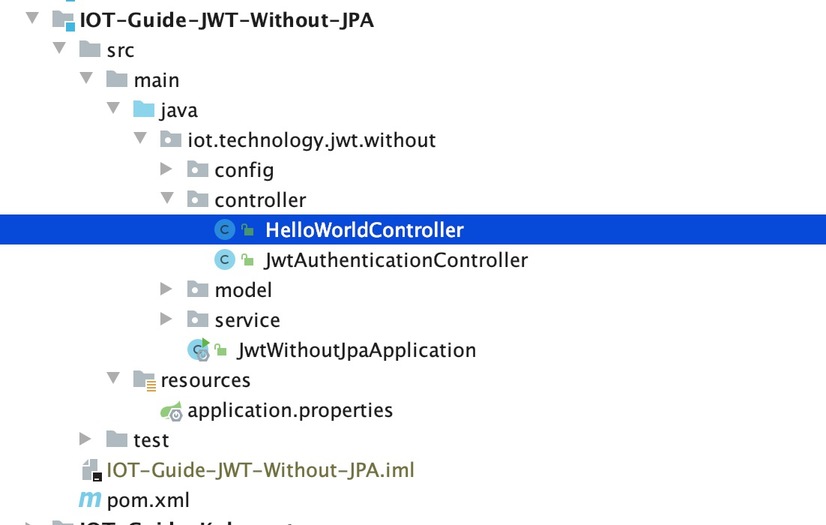
/hello。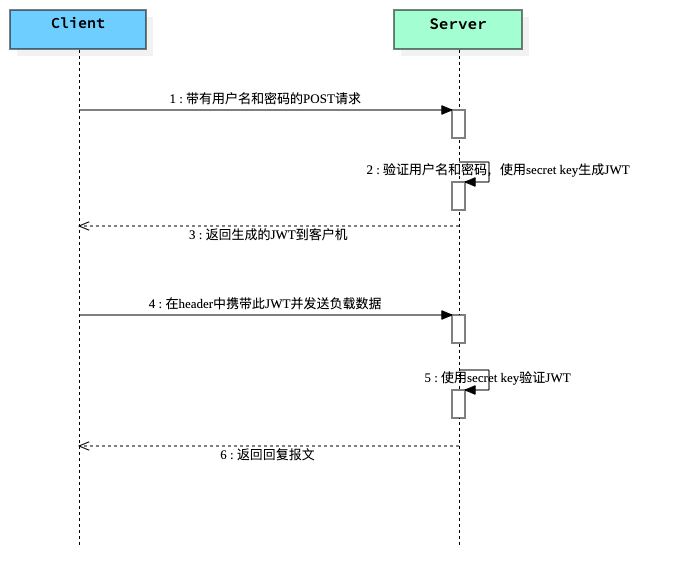
<dependencies>
        <dependency>
            <groupId>org.springframework.boot</groupId>
            <artifactId>spring-boot-starter-web</artifactId>
        </dependency>
</dependencies>
package iot.technology.jwt.without.controller;

import org.springframework.web.bind.annotation.CrossOrigin;
import org.springframework.web.bind.annotation.RequestMapping;
import org.springframework.web.bind.annotation.RestController;

/**
 * @author james mu
 * @date 2020/9/7 19:18
 */
@RestController
@CrossOrigin
public class HelloWorldController {

    @RequestMapping({ "/hello" })
    public String hello() {
        return "Hello World";
    }

}
package iot.technology.jwt.without;

import org.springframework.boot.SpringApplication;
import org.springframework.boot.autoconfigure.SpringBootApplication;

/**
 * @author james mu
 * @date 2020/9/7 17:59
 */
@SpringBootApplication(scanBasePackages = {"iot.technology.jwt.without"})
public class JwtWithoutJpaApplication {

    public static void main(String[] args) {
        SpringApplication.run(JwtWithoutJpaApplication.class, args);
    }
}
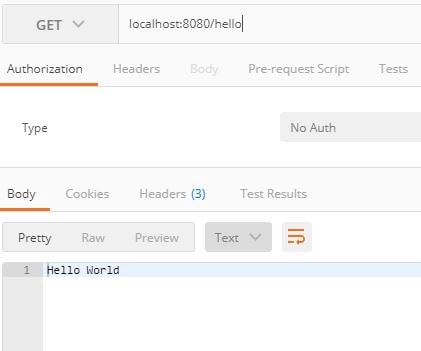
编译并将JwtWithoutJpaApplication.java作为Java应用程序运行。在网页输入localhost:8080/hello。
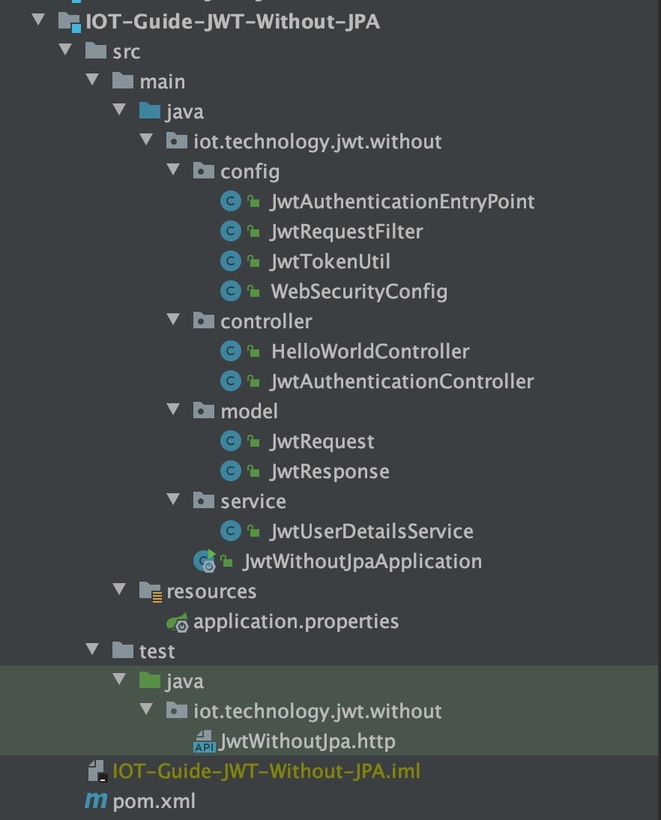
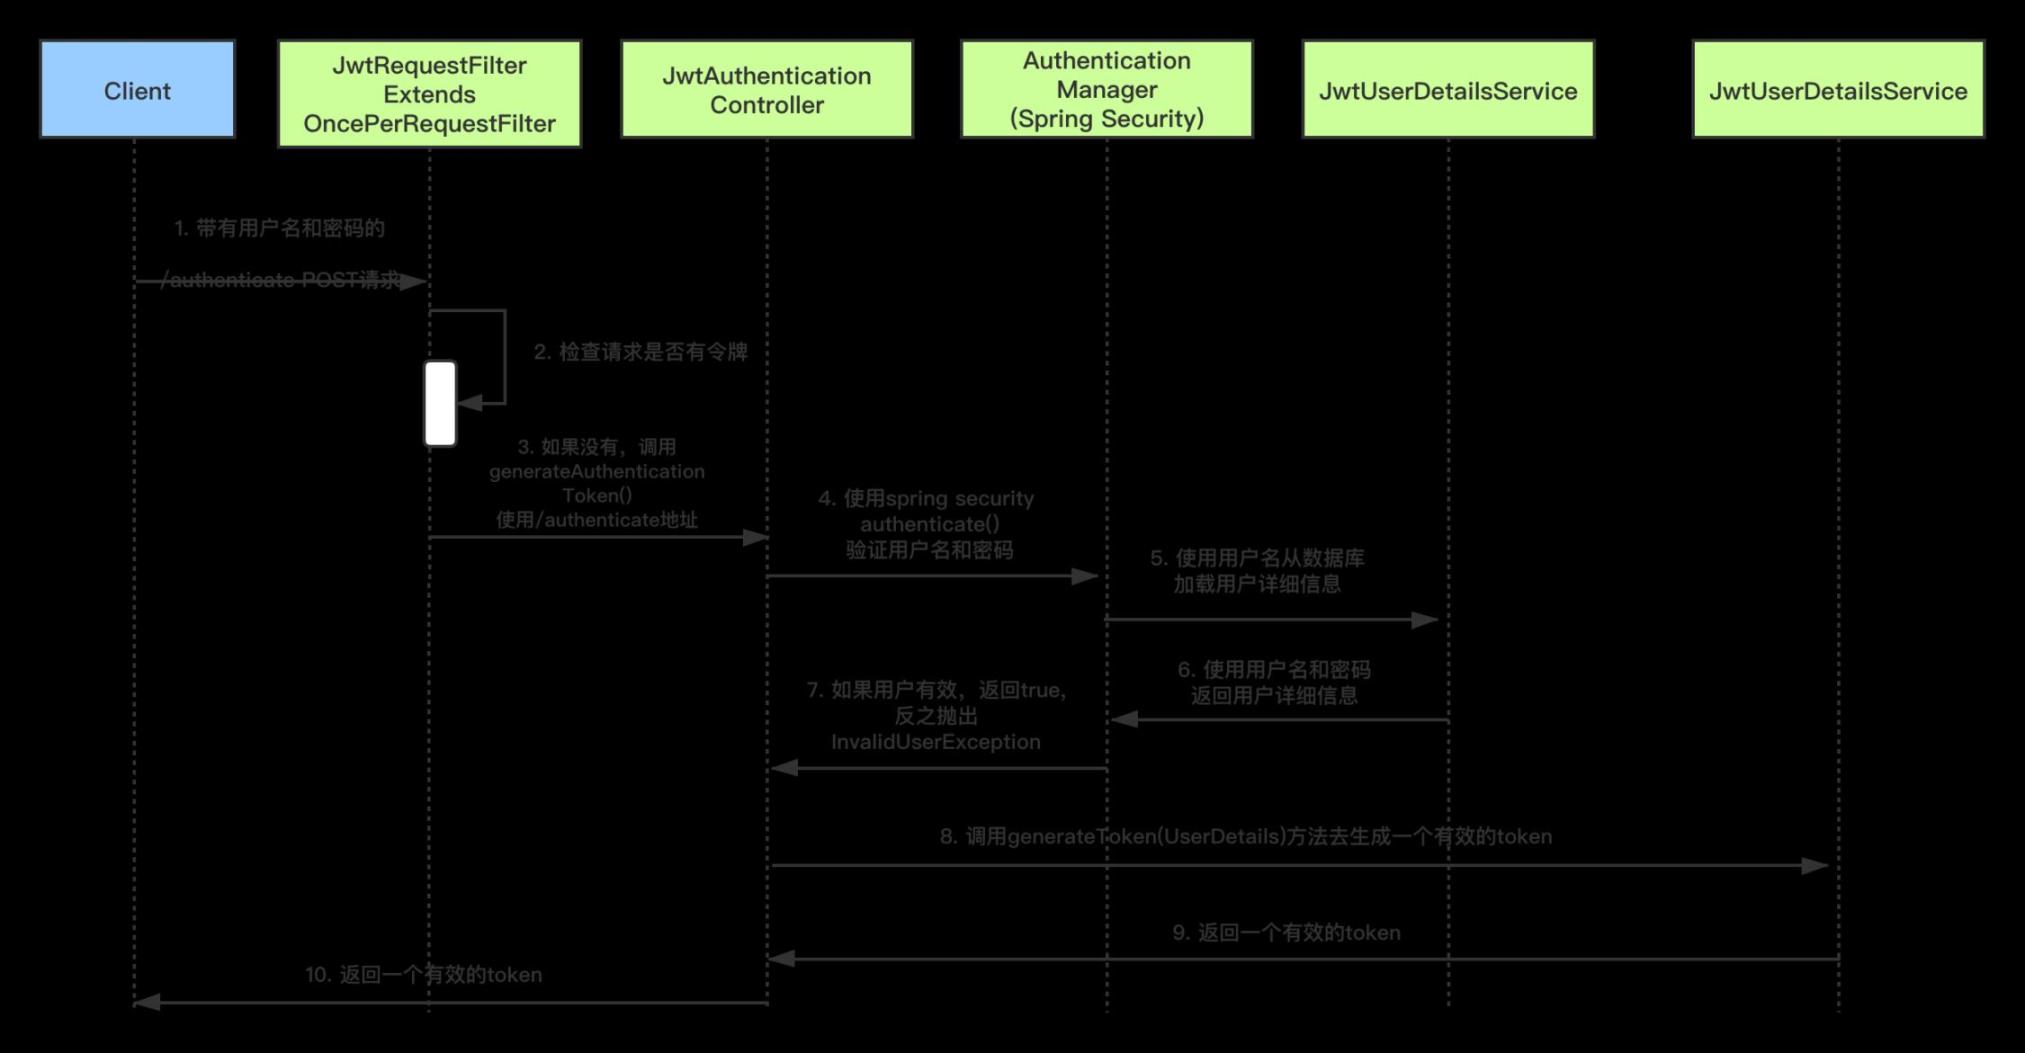
我们将配置Spring Security和JWT来执行两个操作
生成JWT---暴露/authenticate接口。传递正确的用户名和密码后,它将生成一个JSON Web Token(JWT)。
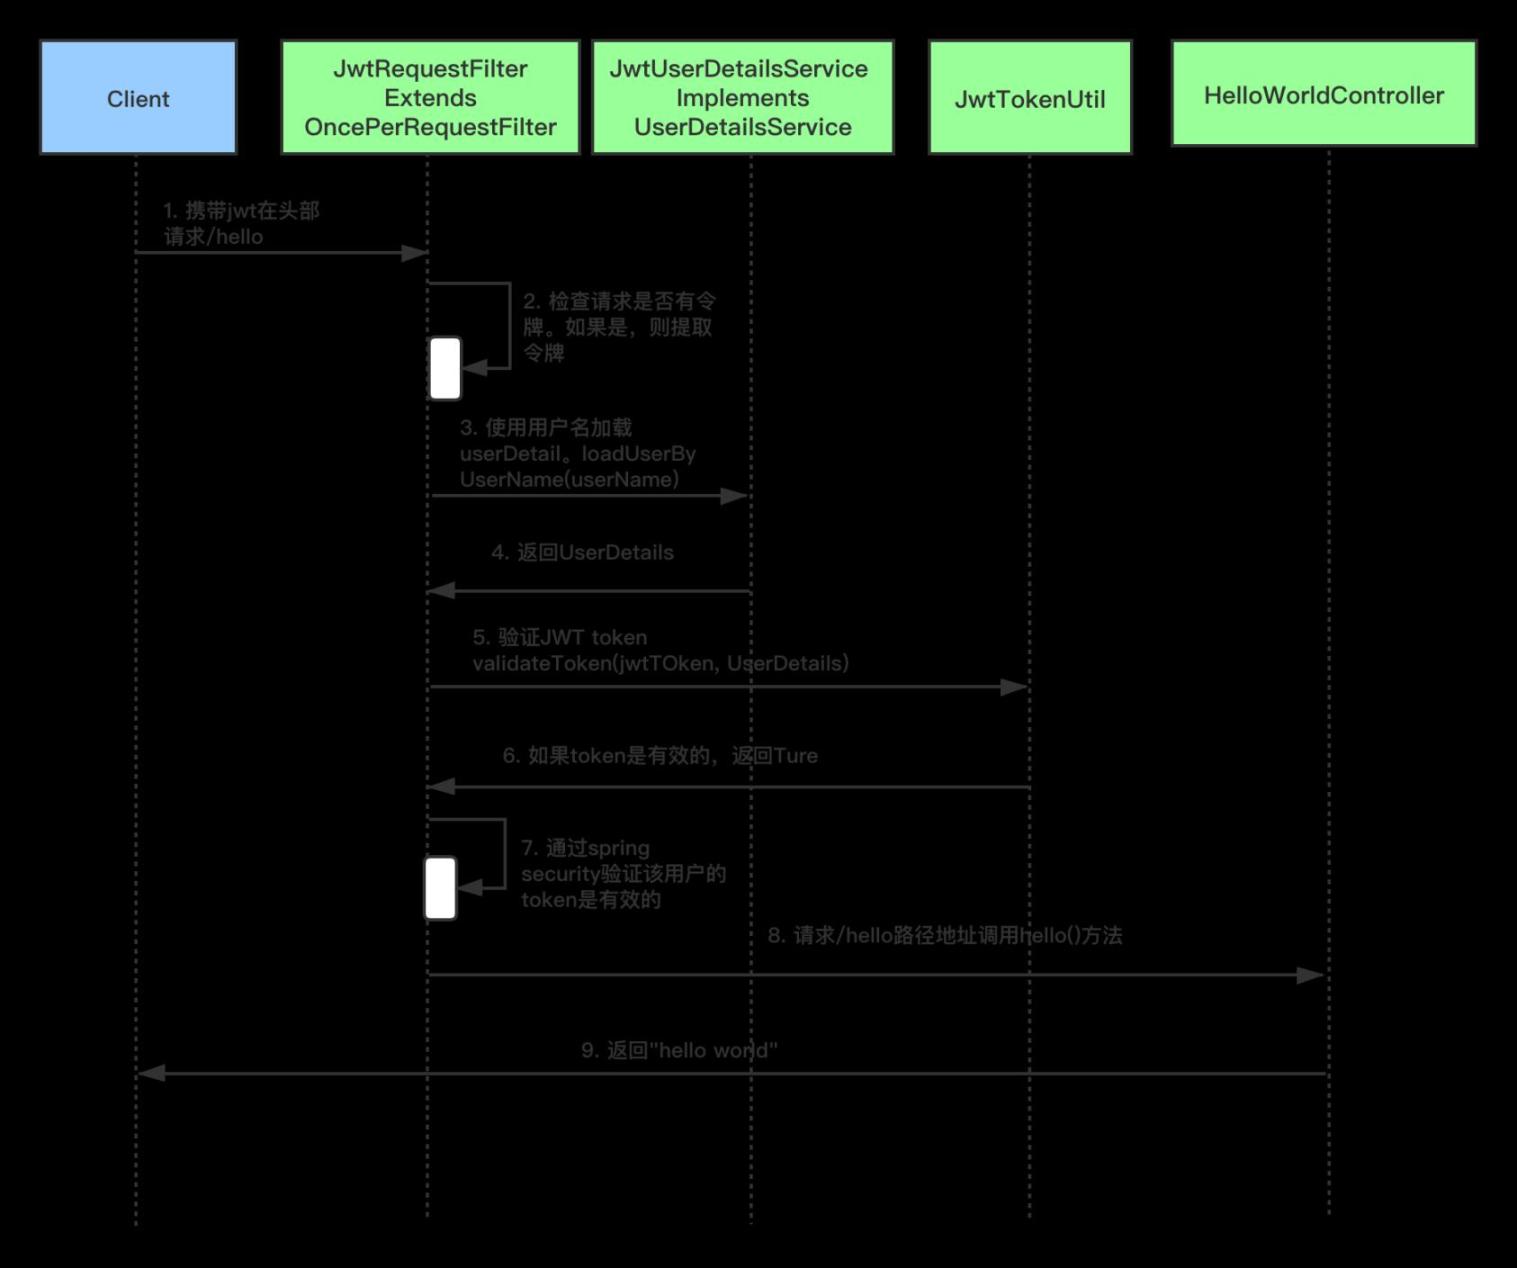
验证JWT---如果用户尝试使用接口/hello,仅当请求具有有效的JSON Web Token(JWT),它才允许访问。
<dependency>
	<groupId>org.springframework.boot</groupId>
	<artifactId>spring-boot-starter-web</artifactId>
</dependency>
<dependency>
	<groupId>org.springframework.boot</groupId>
	<artifactId>spring-boot-starter-security</artifactId>
</dependency>
<dependency>
	<groupId>io.jsonwebtoken</groupId>
	<artifactId>jjwt</artifactId>
</dependency>
定义application.properties。正如在先前的JWT教程中所见,我们指定了用于哈希算法的密钥。密钥与标头和有效载荷结合在一起以创建唯一的哈希。如果您拥有密钥,我们只能验证此哈希。
jwt.secret=iot.technology
JwtTokenUtil
package iot.technology.jwt.without.config;

import io.jsonwebtoken.Claims;
import io.jsonwebtoken.Jwts;
import io.jsonwebtoken.SignatureAlgorithm;
import org.springframework.beans.factory.annotation.Value;
import org.springframework.security.core.userdetails.UserDetails;
import org.springframework.stereotype.Component;

import java.io.Serializable;
import java.util.Date;
import java.util.HashMap;
import java.util.Map;
import java.util.function.Function;

/**
 * @author james mu
 * @date 2020/9/7 19:12
 */
@Component
public class JwtTokenUtil implements Serializable {

    private static final long serialVersionUID = -2550185165626007488L;

    public static final long JWT_TOKEN_VALIDITY = 5*60*60;

    @Value("${jwt.secret}")
    private String secret;

    public String getUsernameFromToken(String token) {
        return getClaimFromToken(token, Claims::getSubject);
    }

    public Date getIssuedAtDateFromToken(String token) {
        return getClaimFromToken(token, Claims::getIssuedAt);
    }

    public Date getExpirationDateFromToken(String token) {
        return getClaimFromToken(token, Claims::getExpiration);
    }

    public <T> T getClaimFromToken(String token, Function<Claims, T> claimsResolver) {
        final Claims claims = getAllClaimsFromToken(token);
        return claimsResolver.apply(claims);
    }

    private Claims getAllClaimsFromToken(String token) {
        return Jwts.parser().setSigningKey(secret).parseClaimsJws(token).getBody();
    }

    private Boolean isTokenExpired(String token) {
        final Date expiration = getExpirationDateFromToken(token);
        return expiration.before(new Date());
    }

    private Boolean ignoreTokenExpiration(String token) {
        // here you specify tokens, for that the expiration is ignored
        return false;
    }

    public String generateToken(UserDetails userDetails) {
        Map<String, Object> claims = new HashMap<>();
        return doGenerateToken(claims, userDetails.getUsername());
    }

    private String doGenerateToken(Map<String, Object> claims, String subject) {

        return Jwts.builder().setClaims(claims).setSubject(subject).setIssuedAt(new Date(System.currentTimeMillis()))
                .setExpiration(new Date(System.currentTimeMillis() + JWT_TOKEN_VALIDITY*1000)).signWith(SignatureAlgorithm.HS512, secret).compact();
    }

    public Boolean canTokenBeRefreshed(String token) {
        return (!isTokenExpired(token) || ignoreTokenExpiration(token));
    }

    public Boolean validateToken(String token, UserDetails userDetails) {
        final String username = getUsernameFromToken(token);
        return (username.equals(userDetails.getUsername()) && !isTokenExpired(token));
    }

}
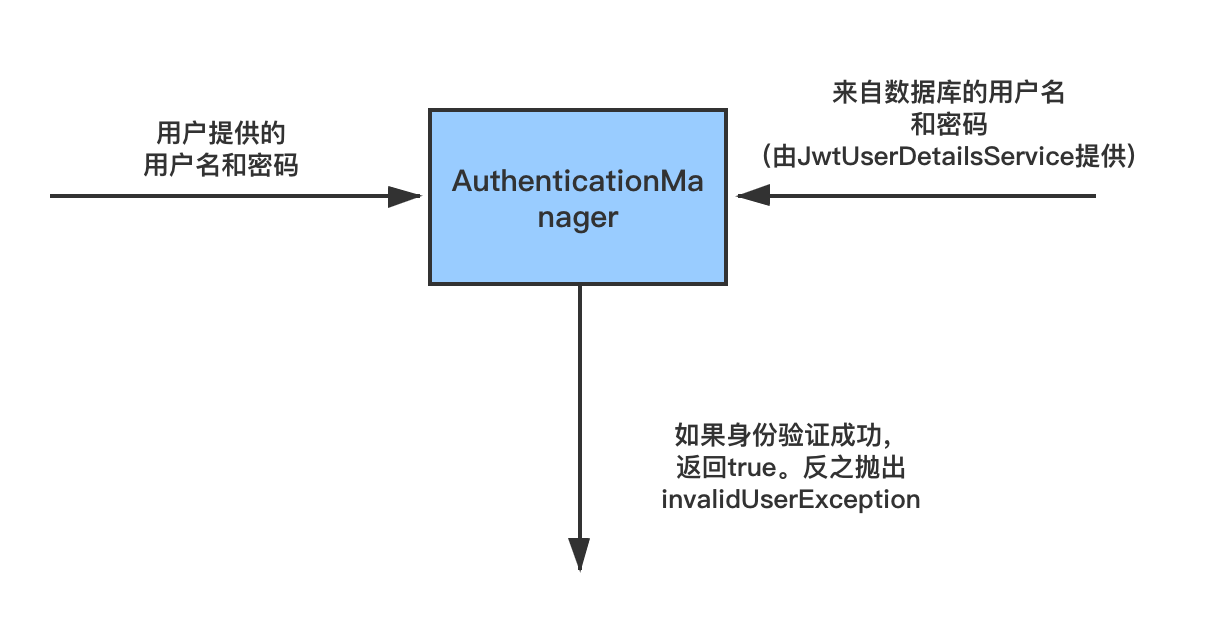
JWTUserDetailsService实现了Spring Security UserDetailsService接口。它会覆盖loadUserByUsername,以便使用用户名从数据库中获取用户详细信息。当对用户提供的用户详细信息进行身份验证时,Spring Security Authentication Manager调用此方法从数据库中获取用户详细信息。在这里,我们从硬编码的用户列表中获取用户详细信息。在接下来的教程中,我们将增加从数据库中获取用户详细信息的DAO实现。用户密码也使用BCrypt以加密格式存储。在这里,您可以使用在线Bcrypt生成器为密码生成Bcrypt。
package iot.technology.jwt.without.service;

import org.springframework.security.core.userdetails.User;
import org.springframework.security.core.userdetails.UserDetails;
import org.springframework.security.core.userdetails.UserDetailsService;
import org.springframework.security.core.userdetails.UsernameNotFoundException;
import org.springframework.stereotype.Service;

import java.util.ArrayList;

/**
 * @author james mu
 * @date 2020/9/7 18:16
 */
@Service
public class JwtUserDetailsService implements UserDetailsService {

    @Override
    public UserDetails loadUserByUsername(String username) throws UsernameNotFoundException {
        if ("iot.technology".equals(username)) {
            return new User("iot.technology", "$2a$10$slYQmyNdGzTn7ZLBXBChFOC9f6kFjAqPhccnP6DxlWXx2lPk1C3G6",
                    new ArrayList<>());
        } else {
            throw new UsernameNotFoundException("User not found with username: " + username);
        }
    }
}
使用JwtAuthenticationController暴露/authenticate。使用Spring Authentication Manager验证用户名和密码。如果凭据有效,则会使用JWTTokenUtil创建一个JWT令牌并将其提供给客户端。
package iot.technology.jwt.without.controller;

import iot.technology.jwt.without.config.JwtTokenUtil;
import iot.technology.jwt.without.model.JwtRequest;
import iot.technology.jwt.without.model.JwtResponse;
import org.springframework.http.ResponseEntity;
import org.springframework.security.authentication.AuthenticationManager;
import org.springframework.security.authentication.BadCredentialsException;
import org.springframework.security.authentication.DisabledException;
import org.springframework.security.authentication.UsernamePasswordAuthenticationToken;
import org.springframework.security.core.userdetails.UserDetails;
import org.springframework.security.core.userdetails.UserDetailsService;
import org.springframework.web.bind.annotation.*;

import java.util.Objects;

/**
 * @author james mu
 * @date 2020/9/7 19:19
 */
@RestController
@CrossOrigin
public class JwtAuthenticationController {

    private final AuthenticationManager authenticationManager;
    private final JwtTokenUtil jwtTokenUtil;
    private final UserDetailsService jwtInMemoryUserDetailsService;

    public JwtAuthenticationController(AuthenticationManager authenticationManager,
                                       JwtTokenUtil jwtTokenUtil,
                                       UserDetailsService jwtInMemoryUserDetailsService) {
        this.authenticationManager = authenticationManager;
        this.jwtTokenUtil = jwtTokenUtil;
        this.jwtInMemoryUserDetailsService = jwtInMemoryUserDetailsService;
    }

    @RequestMapping(value = "/authenticate", method = RequestMethod.POST)
    public ResponseEntity<?> createAuthenticationToken(@RequestBody JwtRequest authenticationRequest)
            throws Exception {

        authenticate(authenticationRequest.getUsername(), authenticationRequest.getPassword());

        final UserDetails userDetails = jwtInMemoryUserDetailsService
                .loadUserByUsername(authenticationRequest.getUsername());

        final String token = jwtTokenUtil.generateToken(userDetails);

        return ResponseEntity.ok(new JwtResponse(token));
    }

    private void authenticate(String username, String password) throws Exception {
        Objects.requireNonNull(username);
        Objects.requireNonNull(password);

        try {
            authenticationManager.authenticate(new UsernamePasswordAuthenticationToken(username, password));
        } catch (DisabledException e) {
            throw new Exception("USER_DISABLED", e);
        } catch (BadCredentialsException e) {
            throw new Exception("INVALID_CREDENTIALS", e);
        }
    }
}
JwtRequest是存储我们从客户端收到的用户名和密码所必须的类。
package iot.technology.jwt.without.model;


import java.io.Serializable;

/**
 * @author james mu
 * @date 2020/9/7 18:30
 */
public class JwtRequest implements Serializable {


    private static final long serialVersionUID = 5926468583005150707L;

    private String username;
    private String password;

    //need default constructor for JSON Parsing
    public JwtRequest()
    {

    }

    public JwtRequest(String username, String password) {
        this.setUsername(username);
        this.setPassword(password);
    }

    public String getUsername() {
        return this.username;
    }

    public void setUsername(String username) {
        this.username = username;
    }

    public String getPassword() {
        return this.password;
    }

    public void setPassword(String password) {
        this.password = password;
    }
}
这是创建包含要返回给用户的JWT响应所必须的类。
package iot.technology.jwt.without.model;


import java.io.Serializable;

/**
 * @author james mu
 * @date 2020/9/7 19:11
 */
public class JwtResponse implements Serializable {
    private static final long serialVersionUID = -8091879091924046844L;
    private final String jwttoken;

    public JwtResponse(String jwttoken) {
        this.jwttoken = jwttoken;
    }

    public String getToken() {
        return this.jwttoken;
    }
}
JwtRequestFilter继承了Spring Web的OncePerRequestFilter类。对于任何传入请求,都会执行此Filter类。它检查请求是否具有有效的JWT令牌。如果它具有有效的JWT令牌,则它将在上下文中设置Authentication,以指定当前用户已通过身份验证。
package iot.technology.jwt.without.config;

import io.jsonwebtoken.ExpiredJwtException;
import iot.technology.jwt.without.service.JwtUserDetailsService;
import lombok.extern.slf4j.Slf4j;
import org.springframework.security.authentication.UsernamePasswordAuthenticationToken;
import org.springframework.security.core.context.SecurityContextHolder;
import org.springframework.security.core.userdetails.UserDetails;
import org.springframework.security.web.authentication.WebAuthenticationDetailsSource;
import org.springframework.stereotype.Component;
import org.springframework.web.filter.OncePerRequestFilter;

import javax.servlet.FilterChain;
import javax.servlet.ServletException;
import javax.servlet.http.HttpServletRequest;
import javax.servlet.http.HttpServletResponse;
import java.io.IOException;

/**
 * @author james mu
 * @date 2020/9/7 19:14
 */
@Slf4j
@Component
public class JwtRequestFilter extends OncePerRequestFilter {


    private final JwtUserDetailsService jwtUserDetailsService;
    private final JwtTokenUtil jwtTokenUtil;

    public JwtRequestFilter(JwtUserDetailsService jwtUserDetailsService, JwtTokenUtil jwtTokenUtil) {
        this.jwtTokenUtil = jwtTokenUtil;
        this.jwtUserDetailsService = jwtUserDetailsService;
    }

    @Override
    protected void doFilterInternal(HttpServletRequest request, HttpServletResponse response, FilterChain chain)
            throws ServletException, IOException {

        final String requestTokenHeader = request.getHeader("Authorization");

        String username = null;
        String jwtToken = null;
        // JWT Token is in the form "Bearer token". Remove Bearer word and get only the Token
        if (requestTokenHeader != null && requestTokenHeader.startsWith("Bearer ")) {
            jwtToken = requestTokenHeader.substring(7);
            try {
                username = jwtTokenUtil.getUsernameFromToken(jwtToken);
            } catch (IllegalArgumentException e) {
                log.error("Unable to get JWT Token");
            } catch (ExpiredJwtException e) {
                log.error("JWT Token has expired");
            }
        } else {
            logger.warn("JWT Token does not begin with Bearer String");
        }

        //Once we get the token validate it.
        if (username != null && SecurityContextHolder.getContext().getAuthentication() == null) {

            UserDetails userDetails = this.jwtUserDetailsService.loadUserByUsername(username);

            // if token is valid configure Spring Security to manually set authentication
            if (jwtTokenUtil.validateToken(jwtToken, userDetails)) {

                UsernamePasswordAuthenticationToken usernamePasswordAuthenticationToken = new UsernamePasswordAuthenticationToken(
                        userDetails, null, userDetails.getAuthorities());
                usernamePasswordAuthenticationToken
                        .setDetails(new WebAuthenticationDetailsSource().buildDetails(request));
                // After setting the Authentication in the context, we specify
                // that the current user is authenticated. So it passes the Spring Security Configurations successfully.
                SecurityContextHolder.getContext().setAuthentication(usernamePasswordAuthenticationToken);
            }
        }
        chain.doFilter(request, response);
    }
}
此类继承Spring Security的AuthenticationEntryPoint类,并重写其commence。它拒绝每个未经身份验证的请求并发送错误代码401。
package iot.technology.jwt.without.config;

import org.springframework.security.core.AuthenticationException;
import org.springframework.security.web.AuthenticationEntryPoint;
import org.springframework.stereotype.Component;

import javax.servlet.http.HttpServletRequest;
import javax.servlet.http.HttpServletResponse;
import java.io.IOException;
import java.io.Serializable;

/**
 * @author james mu
 * @date 2020/9/7 19:17
 */
@Component
public class JwtAuthenticationEntryPoint implements AuthenticationEntryPoint, Serializable {

    private static final long serialVersionUID = -7858869558953243875L;

    @Override
    public void commence(HttpServletRequest request, HttpServletResponse response,
                         AuthenticationException authException) throws IOException {

        response.sendError(HttpServletResponse.SC_UNAUTHORIZED, "Unauthorized");
    }
}
此类扩展了WebSecurityConfigurerAdapter,它为WebSecurity和HttpSecurity进行自定义提供了便捷性。
package iot.technology.jwt.without.config;

import org.springframework.beans.factory.annotation.Autowired;
import org.springframework.context.annotation.Bean;
import org.springframework.context.annotation.Configuration;
import org.springframework.security.authentication.AuthenticationManager;
import org.springframework.security.config.annotation.authentication.builders.AuthenticationManagerBuilder;
import org.springframework.security.config.annotation.method.configuration.EnableGlobalMethodSecurity;
import org.springframework.security.config.annotation.web.builders.HttpSecurity;
import org.springframework.security.config.annotation.web.configuration.EnableWebSecurity;
import org.springframework.security.config.annotation.web.configuration.WebSecurityConfigurerAdapter;
import org.springframework.security.config.http.SessionCreationPolicy;
import org.springframework.security.core.userdetails.UserDetailsService;
import org.springframework.security.crypto.bcrypt.BCryptPasswordEncoder;
import org.springframework.security.crypto.password.PasswordEncoder;
import org.springframework.security.web.authentication.UsernamePasswordAuthenticationFilter;

/**
 * @author james mu
 * @date 2020/9/7 19:16
 */
@Configuration
@EnableWebSecurity
@EnableGlobalMethodSecurity(prePostEnabled = true)
public class WebSecurityConfig extends WebSecurityConfigurerAdapter {

    private final JwtAuthenticationEntryPoint jwtAuthenticationEntryPoint;
    private final UserDetailsService jwtUserDetailsService;
    private final JwtRequestFilter jwtRequestFilter;

    public WebSecurityConfig(JwtAuthenticationEntryPoint jwtAuthenticationEntryPoint,
                             UserDetailsService jwtUserDetailsService,
                             JwtRequestFilter jwtRequestFilter) {
        this.jwtAuthenticationEntryPoint = jwtAuthenticationEntryPoint;
        this.jwtUserDetailsService = jwtUserDetailsService;
        this.jwtRequestFilter = jwtRequestFilter;
    }

    @Autowired
    public void configureGlobal(AuthenticationManagerBuilder auth) throws Exception {
        // configure AuthenticationManager so that it knows from where to load
        // user for matching credentials
        // Use BCryptPasswordEncoder
        auth.userDetailsService(jwtUserDetailsService).passwordEncoder(passwordEncoder());
    }

    @Bean
    public PasswordEncoder passwordEncoder() {
        return new BCryptPasswordEncoder();
    }

    @Bean
    @Override
    public AuthenticationManager authenticationManagerBean() throws Exception {
        return super.authenticationManagerBean();
    }

    @Override
    protected void configure(HttpSecurity httpSecurity) throws Exception {
        // We don't need CSRF for this example
        httpSecurity.csrf().disable()
                // dont authenticate this particular request
                .authorizeRequests().antMatchers("/authenticate").permitAll().
                // all other requests need to be authenticated
                        anyRequest().authenticated().and().
                // make sure we use stateless session; session won't be used to
                // store user's state.
                        exceptionHandling().authenticationEntryPoint(jwtAuthenticationEntryPoint).and().sessionManagement()
                .sessionCreationPolicy(SessionCreationPolicy.STATELESS);

        // Add a filter to validate the tokens with every request
        httpSecurity.addFilterBefore(jwtRequestFilter, UsernamePasswordAuthenticationFilter.class);
    }
}
启动Spring Boot应用程序
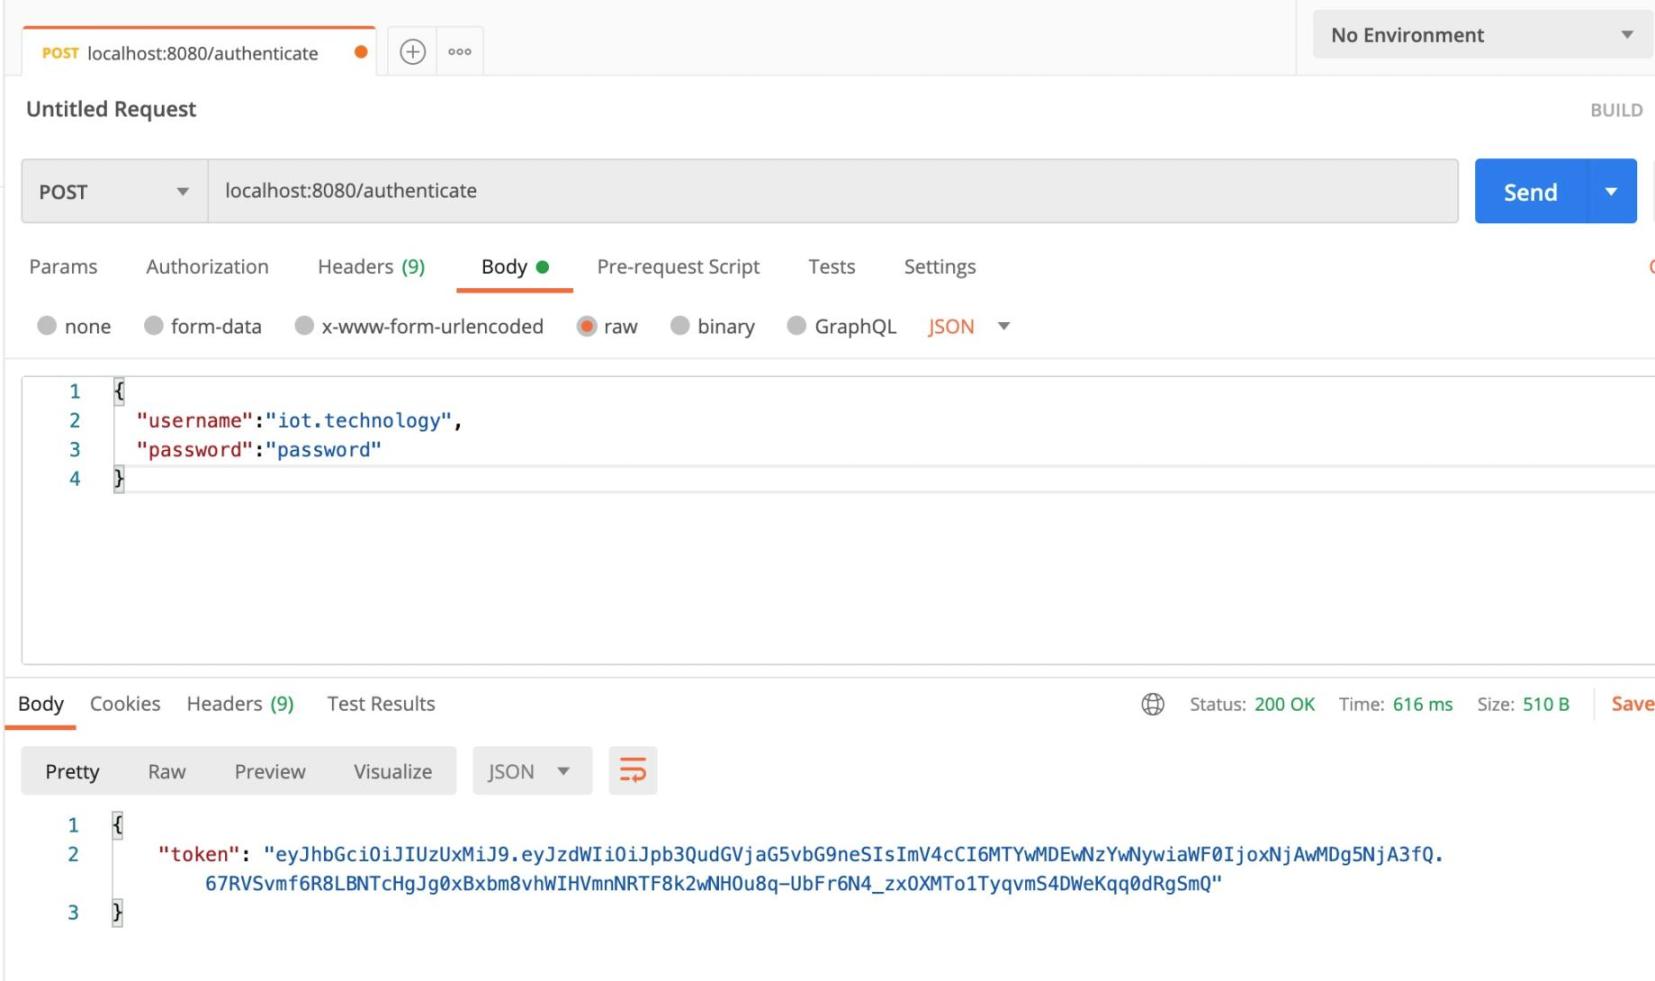
生成JSON Web Token(JWT)
使用Url localhost:8080/authenticate创建POST请求。正文应具有有效的用户名和密码。在我们的情况下,用户名是: iot.technology, 密码是: password。
验证JSON Web Token(JWT)
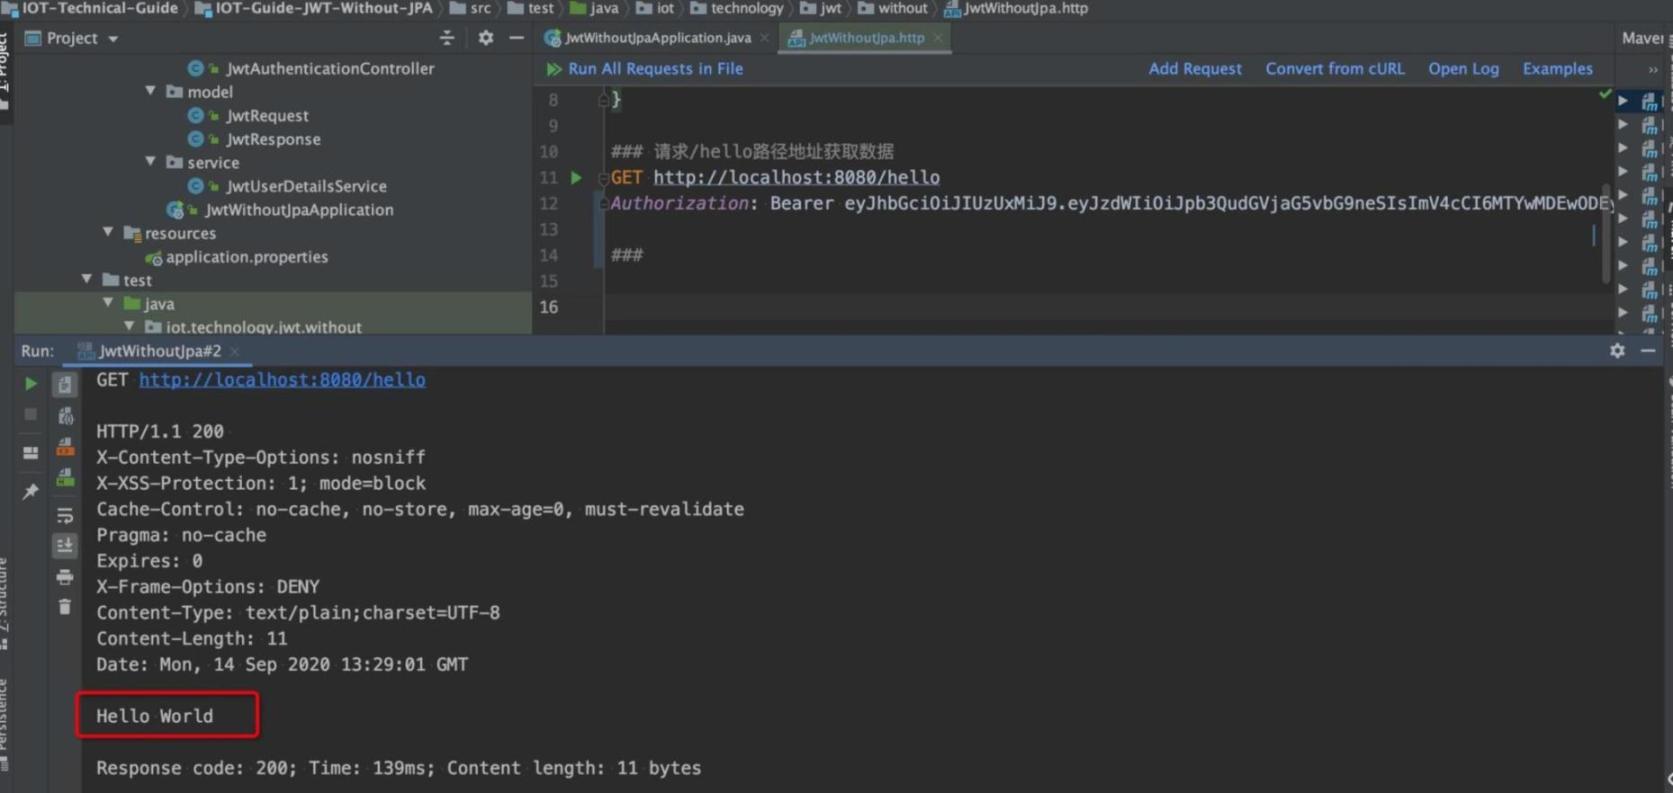
尝试使用上述生成的令牌访问Url localhost:8080/hello,如下所示
项目源代码:
https://github.com/IoT-Technology/IOT-Technical-Guide/tree/master/IOT-Guide-JWT-Without-JPA